
Print File Export lets you download a customer’s finished design as a print-ready SVG or PNG file straight from an order or quote request, so you no longer have to rebuild the artwork by hand.
The Print File Export panel appears on WooCommerce orders (WooCommerce → Orders) and on quote requests and Contact Form 7 submissions (Configurator → Config Mail List). It shows a live preview of the design for each view (for example Front and Back), and lets you choose the file format, size and which layers go into the file.
With Print File Export you can:
- Download the design as SVG (vector, text stays editable) or PNG (raster, exact pixel size).
- Keep mockup-only layers, such as the product photo and its shadow, out of the print file.
- Download the files the customer uploaded with their design.
- Set a minimum size for uploaded images so low-resolution artwork is refused before it reaches print.
Turning on Print File Export
Print File Export is off by default. Go to Configurator → Settings → General → Print File Export, set Enable Print File Export to Yes, and save.
Designs are saved with every order and quote request even while the feature is off, so earlier orders can still be exported once you turn it on.
On orders, the panel is available to anyone who can edit WooCommerce orders (Shop Manager and Administrator by default). On Config Mail List records, it is available to anyone who can edit the record.
Setting up your configurator
Two optional settings in the configurator editor control what ends up in the print file and what customers may upload. Neither is required: without them, every layer is exported and any upload size is accepted.
Leave mockup-only layers out of the print file
Product photos, shadows and similar layers exist only to make the preview look realistic. They should not be printed.
- Open the configurator in the editor and select the layer in the Layers panel (for example, a product photo layer).
- In the right-hand settings panel, find Leave Out of the Print File.
- Tick the box, then click Save.
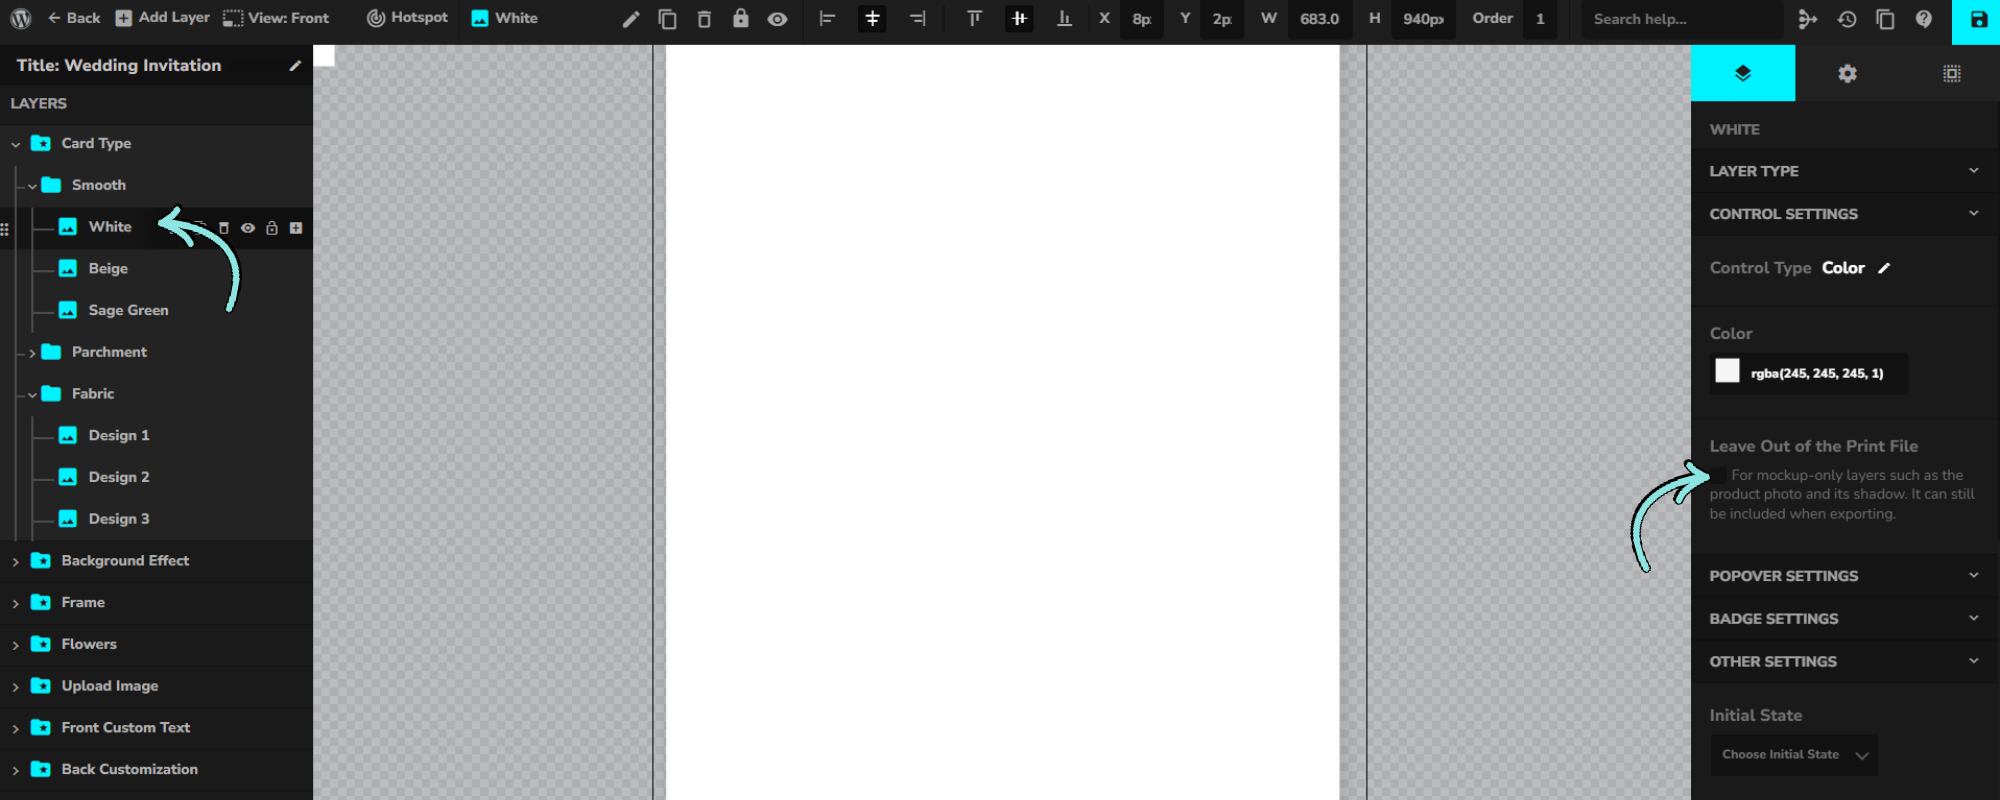
A layer marked this way starts unticked in the export panel, so it is not exported by default. You can still tick it manually on a specific order if you need it in the file.
Set a minimum size for customer uploads
Low-resolution images print badly. If your configurator has a Custom Image Upload layer, you can refuse images that are too small.
- Select the Custom Image Upload layer in the editor.
- Tick Enable Minimum Size Restriction.
- Enter the minimum W (width) and H (height) in pixels, for example 1200 × 1200.
- Click Save.
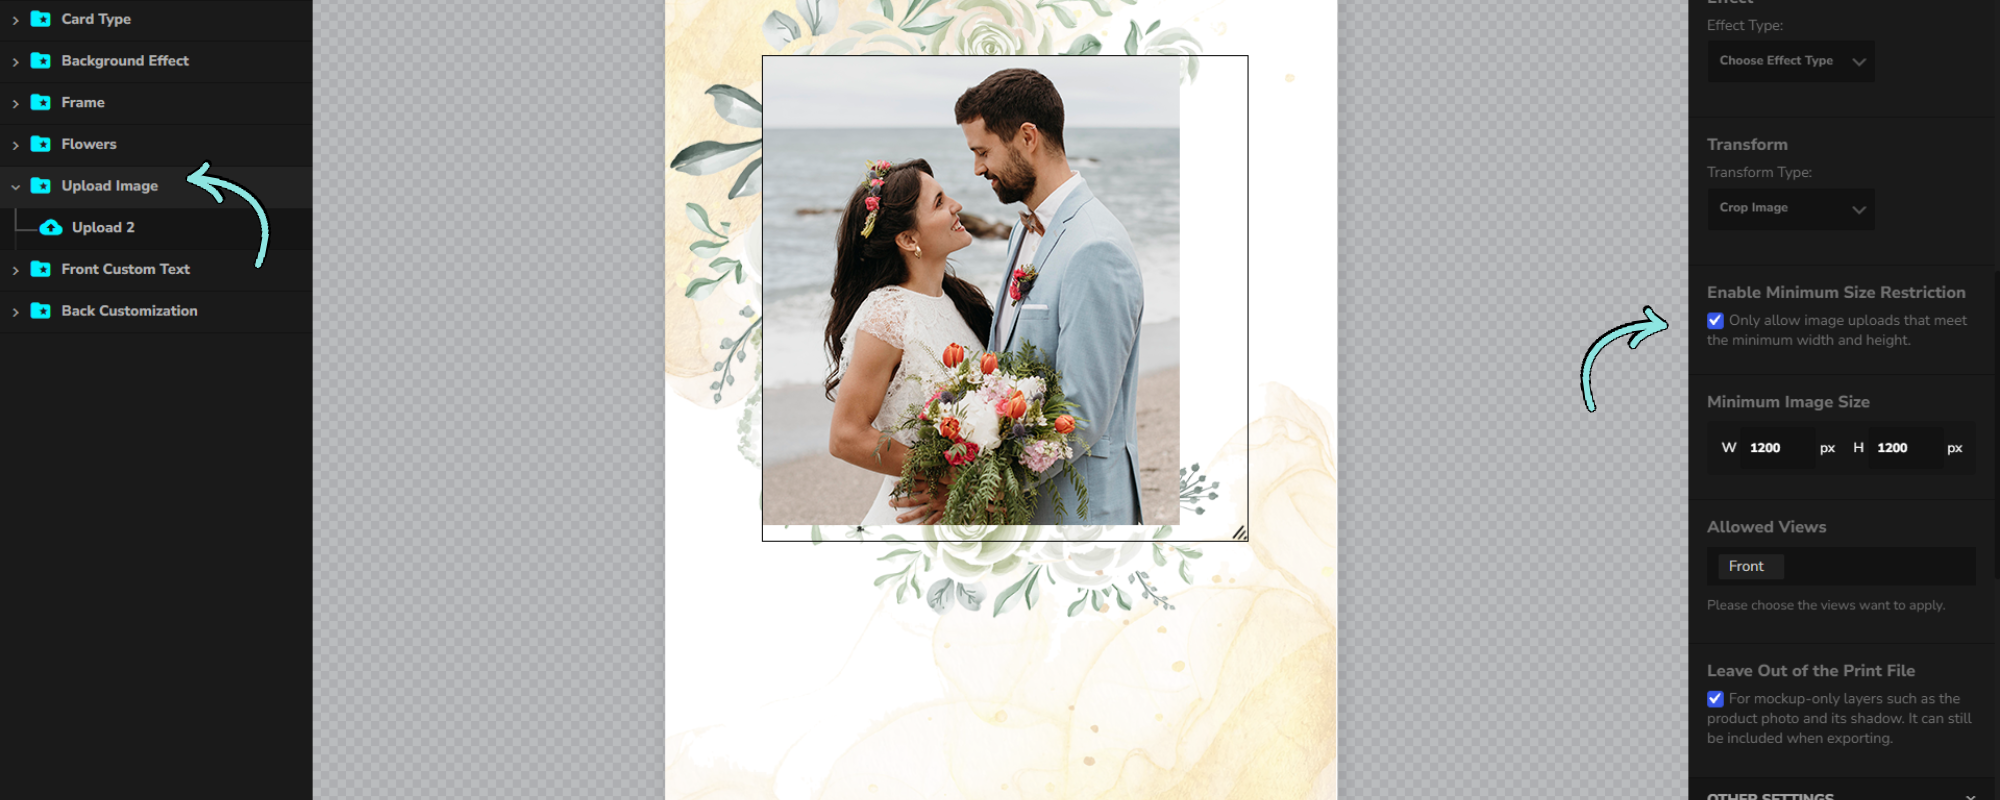
The minimum is enforced in three places:
- When uploading. An image below the minimum is refused, and a message appears under the upload field.
- When adding to cart. An image that the customer has cropped below the minimum is refused.
- When submitting a quote request. The same cropped-image check applies.
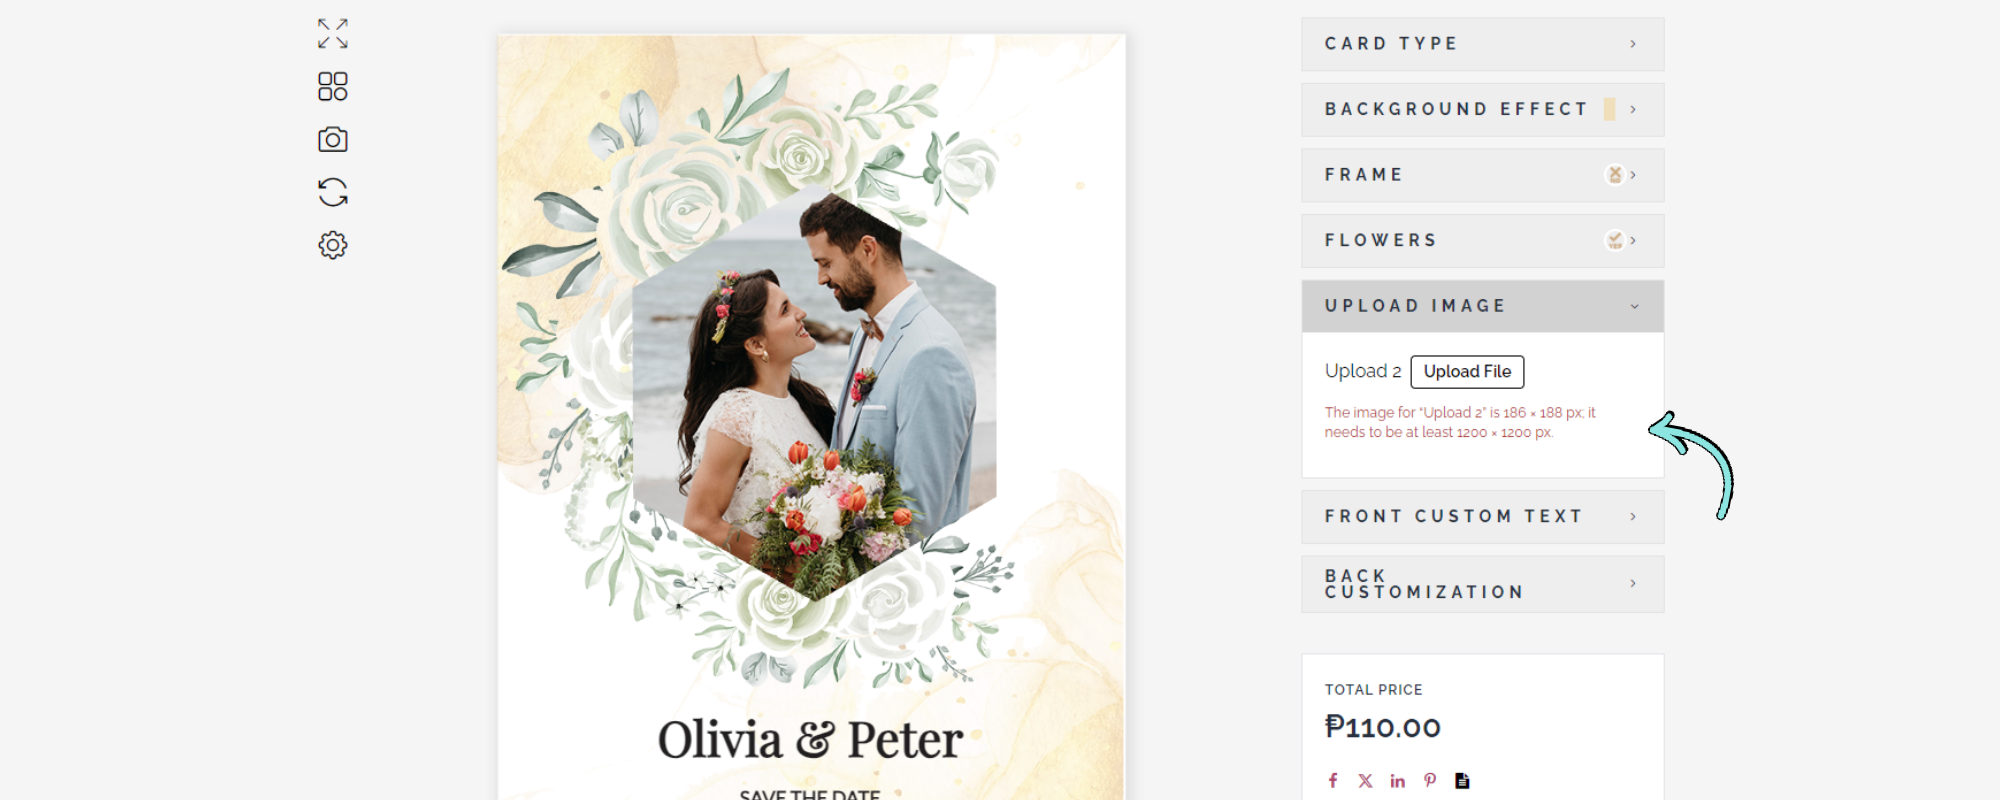
If you turn off the Custom Image Upload feature, the size controls and the check disappear and nothing else is affected.
Exporting a print file
The panel works the same way on WooCommerce orders, quote requests and contact form submissions.
- Open the record. For an order, go to WooCommerce → Orders. For a quote request or contact form submission, go to Configurator → Config Mail List.
- Scroll to the Print File Export panel.
- Under View, choose Front or Back. The preview shows the customer’s design for that view.
- Under Format, choose SVG or PNG.
- Check the File name and Size. Change them if needed (see the options reference below).
- In Layers in the file, untick anything that should not be printed. Layers marked in the editor as left out start unticked.
- Click Download SVG (or Download PNG). A Saved message confirms your layer choices were stored.
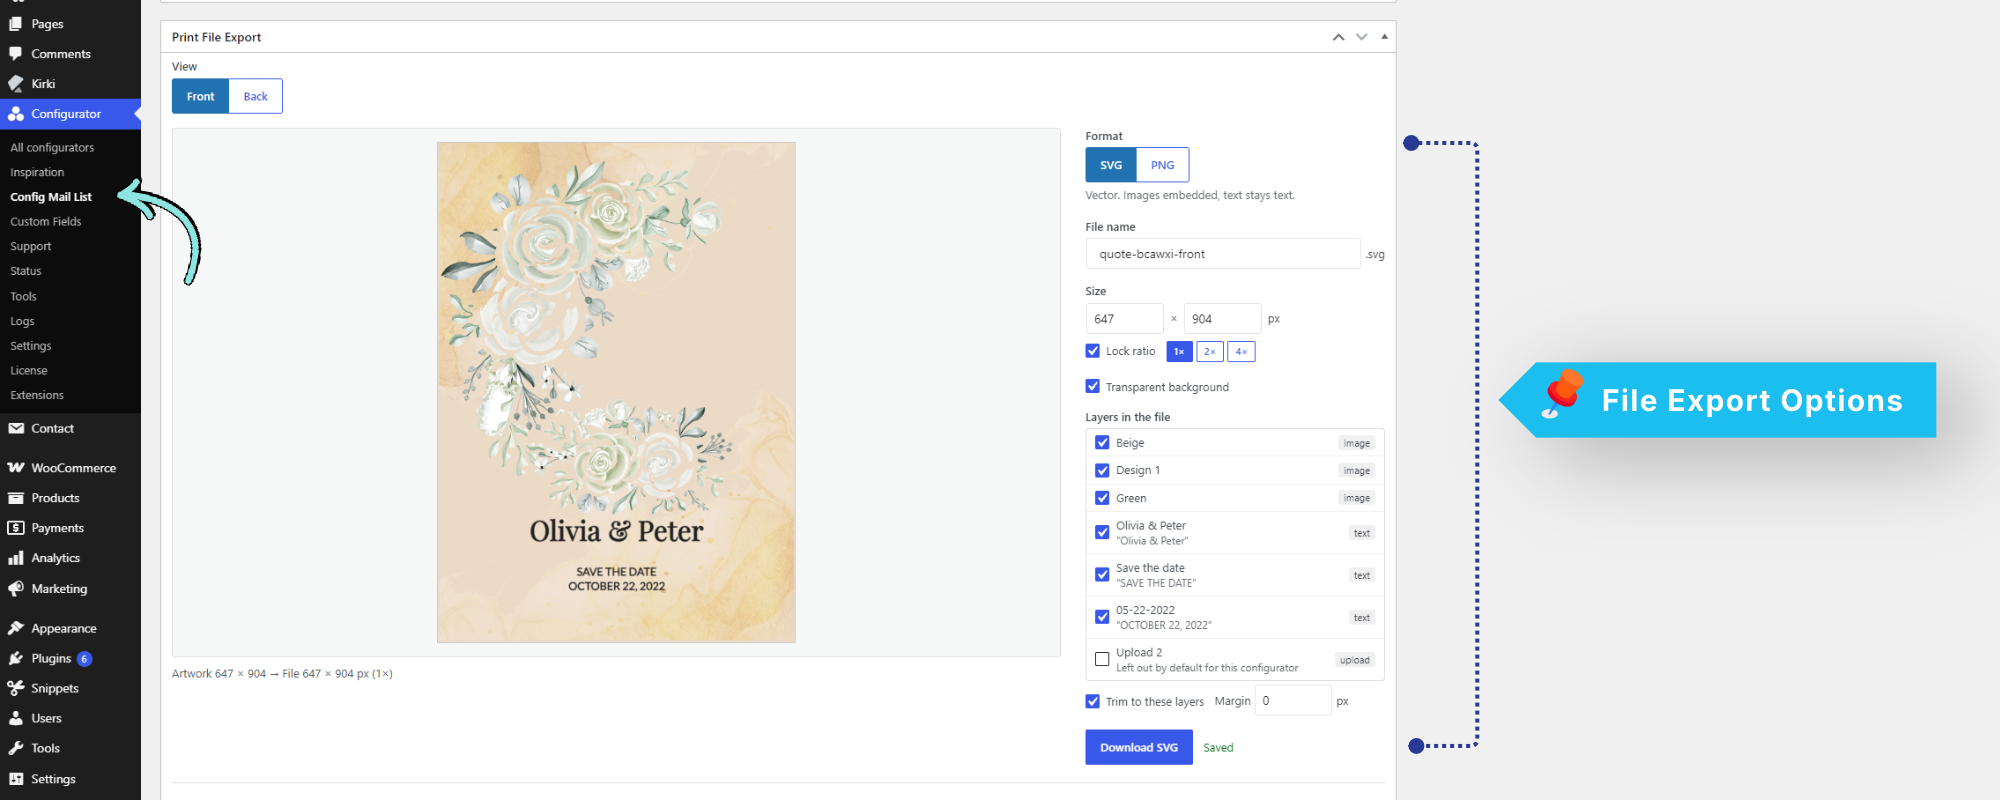
Each view is exported on its own, so repeat steps 3 to 7 for the Back view.
Choosing between SVG and PNG
| SVG | PNG | |
|---|---|---|
| Type | Vector | Raster image |
| Text | Stays live text, so you can edit it | Flattened into pixels |
| Images | Embedded in the file | Flattened into pixels |
| Size | Scales without quality loss | Downloads at the exact pixel size you enter |
| Best for | Editing in a vector tool before printing | Sending a ready-to-print image at a fixed size |
An SVG can be opened in a vector editor such as Illustrator, Inkscape or Boxy SVG, where the customer’s text can still be selected and edited.
Customer files
Below the export panel, Customer files lists the original images the customer uploaded with their design. Click a file to download it. If the customer uploaded nothing, the list reads “No files were uploaded with this design.”
Options reference
| Option | What it does |
|---|---|
| View | Switches between the configurator’s views (Front, Back). The preview and the exported file follow the selected view. |
| Format | SVG (vector, text stays editable) or PNG (raster at an exact size). |
| File name | Name of the downloaded file. The extension (.svg or .png) is added for you. The default looks like quote-bcawxi-front. |
| Size | Width and height in pixels. It starts at the artwork size, for example 647 × 904 px. |
| Lock ratio | When ticked, changing the width or height adjusts the other so the proportions stay the same. |
| 1× / 2× / 4× | Quick multipliers for the size. 2× doubles both dimensions and 4× quadruples them, which is useful for sharper PNG files. |
| Transparent background | When ticked, areas with no artwork stay transparent instead of white. |
| Layers in the file | One checkbox per layer, labelled with its type (image, text, upload). Untick a layer to leave it out. |
| Trim to these layers | Crops the file to the edges of the ticked layers, so unused empty space (such as a product photo’s margins) is removed. |
| Margin | Extra space in pixels around the artwork when trimming. Default is 0. |
The line under the preview, such as Artwork 647 × 904 → File 647 × 904 px (1×), shows the original artwork size and the size of the file you are about to download.
How layers are listed
- Text layers show the layer name and the customer’s text, for example Olivia & Peter, “Olivia & Peter”.
- Layers marked Leave Out of the Print File in the editor show Left out by default for this configurator and start unticked.
- Your tick choices are saved automatically (the Saved message), so they are still there when you reopen the record.
Tips
- For a clean print file, untick the product photo and keep Trim to these layers on. The file then contains only the artwork.
- Use SVG when the printer needs to edit text. Use PNG when you need a fixed pixel size, and pick 2× or 4× for extra sharpness.
- Tick Transparent background if the artwork will be placed on a coloured or textured stock.
- Set a minimum upload size in the editor to catch low-resolution images before they become orders.