
WP Configurator Pro can be integrated with YITH Request a Quote for WooCommerce (free or Premium) to create a quote-based shopping experience.
Instead of immediately purchasing a configured product, customers can add their configured products to a quote basket. They can then continue browsing the website, configure and add additional products, and finally submit all selected products as a single quote request.
This is useful for businesses that need to review product configurations, quantities, pricing, or other requirements before providing a final quotation.
How the integration works
This setup uses three components:
- WP Configurator Pro – Allows customers to configure products.
- WooCommerce – is a tool that turns your WordPress website into an online store where you can sell products, accept payments, and manage orders.
- YITH WooCommerce Request a Quote or YITH Request a Quote for WooCommerce Premium — Provides the quote basket and quote request functionality. Works with both the free and Premium versions.
The resulting customer flow is:
Configure product → Add to quote basket → Continue shopping → Configure more products → Submit quote
Note: This guide assumes WP Configurator Pro, WooCommerce and YITH Request a Quote are installed and
activated. The integration is built into WP Configurator Pro [version] and later.
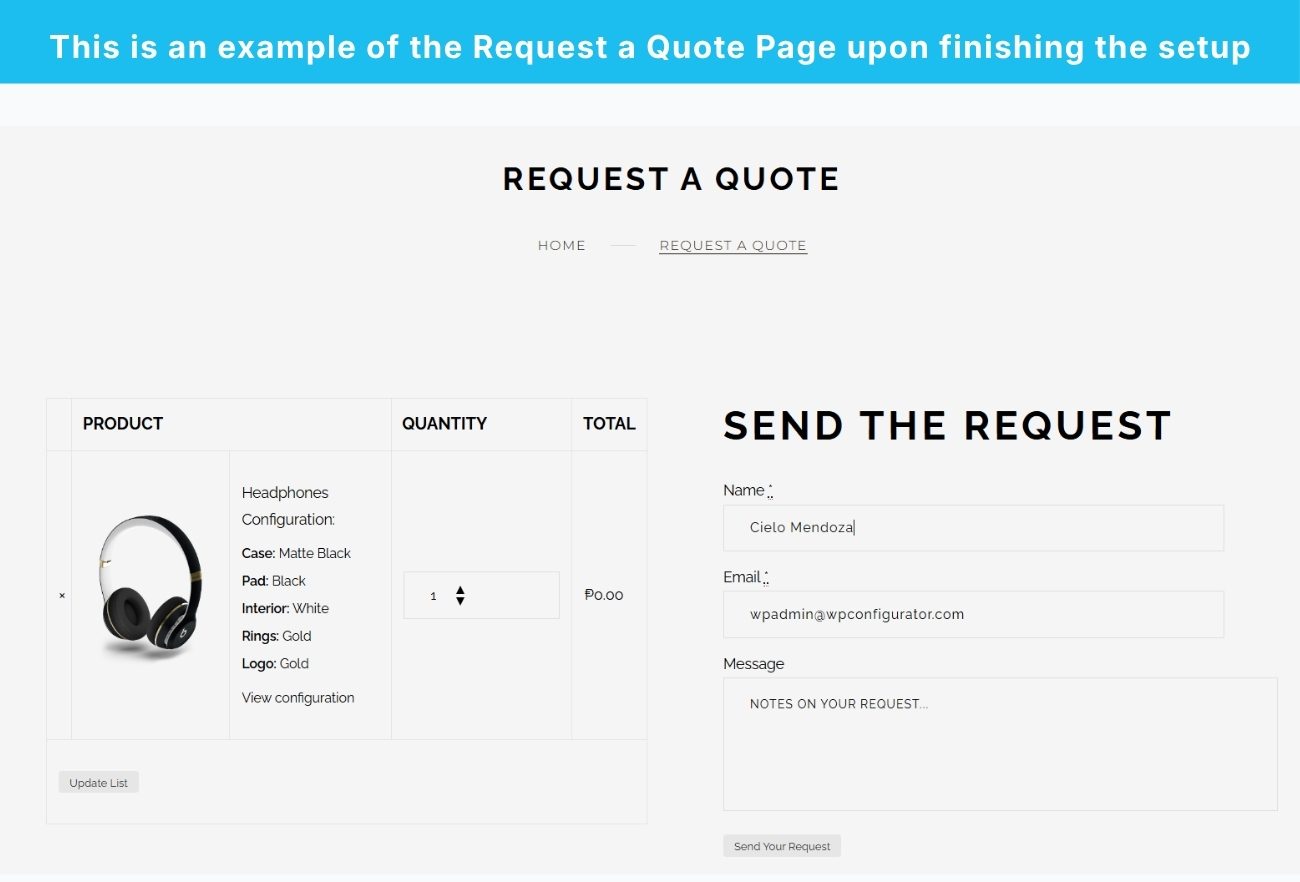
Setting up the workflow
1. Turn on Quote Basket
Go to Configurator → Settings → General → Request a Quote (YITH) and set Quote Basket to Enable.
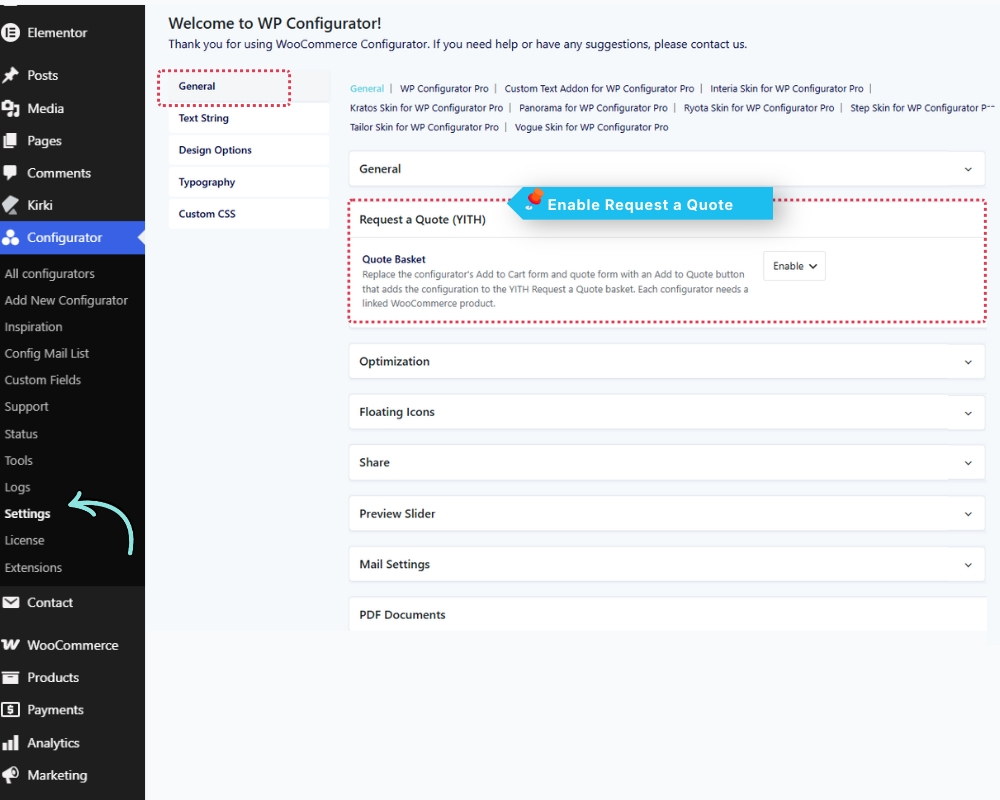
Note: This applies to every configurator linked to a product. Their Add to Cart and quote forms are replaced,
so those products can no longer be bought directly.
2. Link the Product to the Configurator
Next, make sure the WooCommerce product you want customers to configure is linked to your WP Configurator Pro configurator.
Go to:WordPress Dashboard → Products → Edit the Product
Open the WooCommerce product you want to use with the configurator.
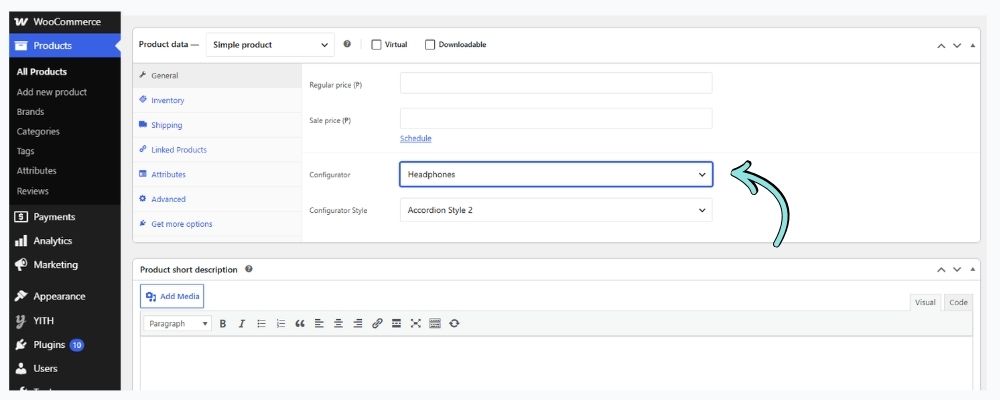
In Product data → General, choose your configurator in the Configurator field. This field is available for Simple products only. Save or update the product.
Once this is configured, the product should display the configurator on the front end, allowing customers to customize it before adding it to their quote basket.
3. Ensure the Configurator Uses the Cart/Quote Form
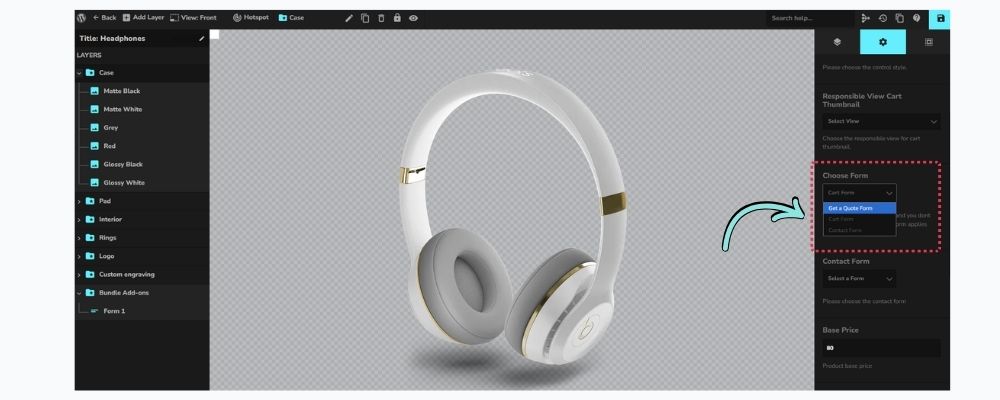
Next, set the configurator’s form to Cart Form or Get a Quote Form. Contact Form is not supported and keeps WP Configurator’s contact form.
Open the configurator in the editor, go to the settings tab (gear icon), and select the form under Choose Form. Contact Form is listed only when Contact Form 7 is active.
After making the required change, save the configurator.
4. Check the Request a Quote Page
When you activate YITH Request a Quote (free or Premium), it automatically creates a Request a Quote page with the request-quote slug. The page already contains the required shortcode and is automatically selected in the plugin settings.
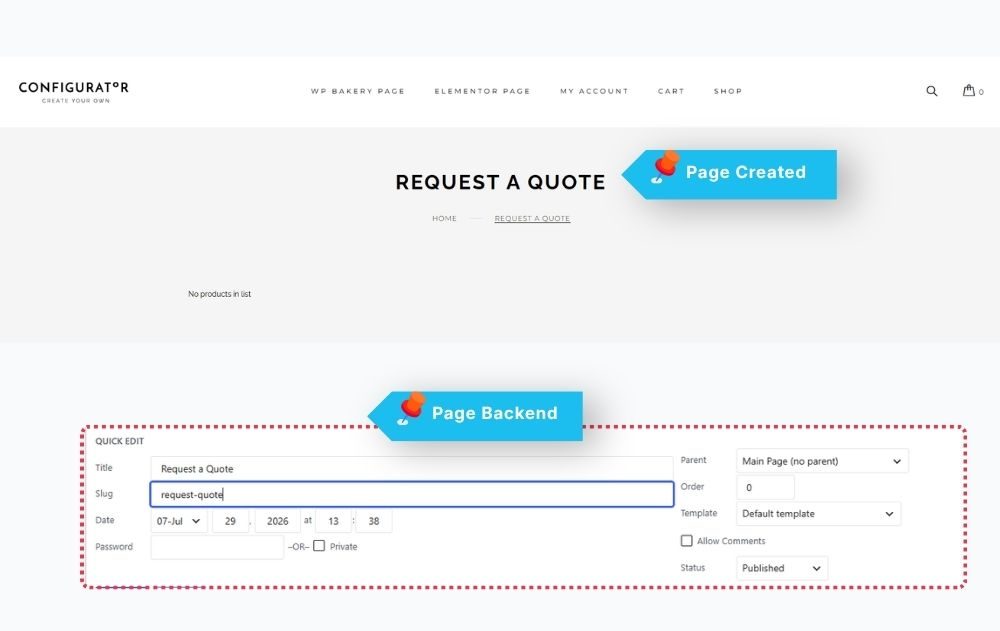
First, check whether the page exists and is working correctly. You usually don’t need to create a new one.
If the page was deleted or you want to use a different page:
- Go to WordPress Dashboard → Pages → Add New.
- Create a page titled Request a Quote or another suitable name.
- Add the following shortcode to the page content: [yith_ywraq_request_quote]
- Publish the page.
Your page will serve as the customer’s quote basket, displaying the products they’ve added and allowing them to proceed with their quote request.
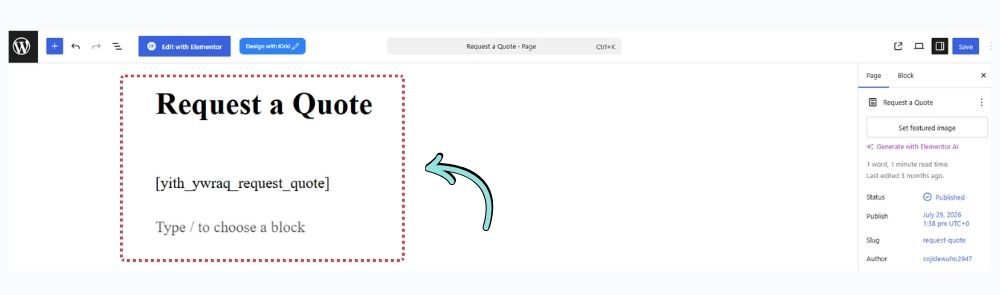
5. Set the Quote Page in YITH Request a Quote
Now tell YITH Request a Quote which page should be used as the quote page.
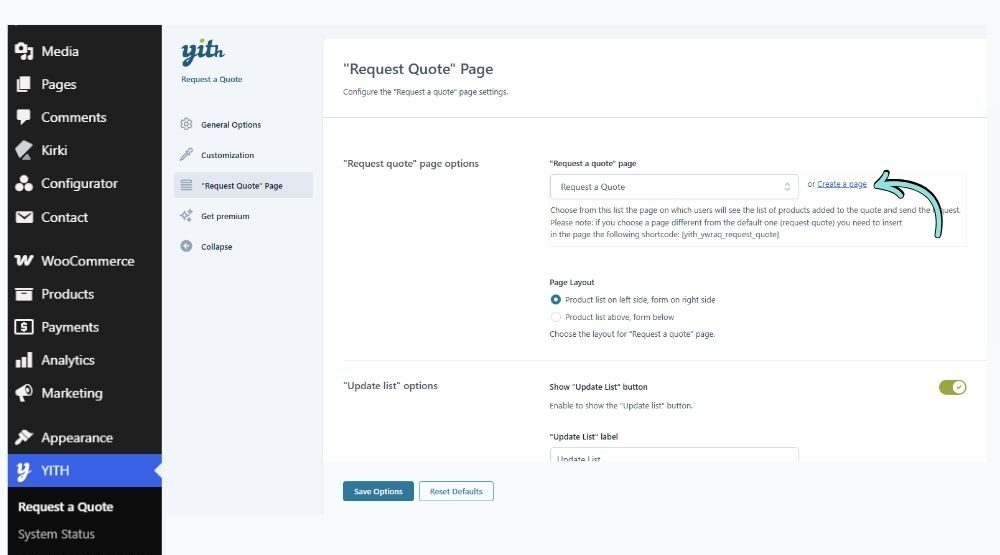
Go to: WordPress Dashboard → YITH → Request a Quote → “Request Quote” Page → Page Options → “Request a quote” page.
Select your Request a Quote page..
Save the settings.
Once a product is in the quote list, the Add to Quote button is replaced by an ‘already in the list’ message. To quote a different configuration, remove the item from the quote page and configure it again. For more identical units, raise the quantity on the quote page.
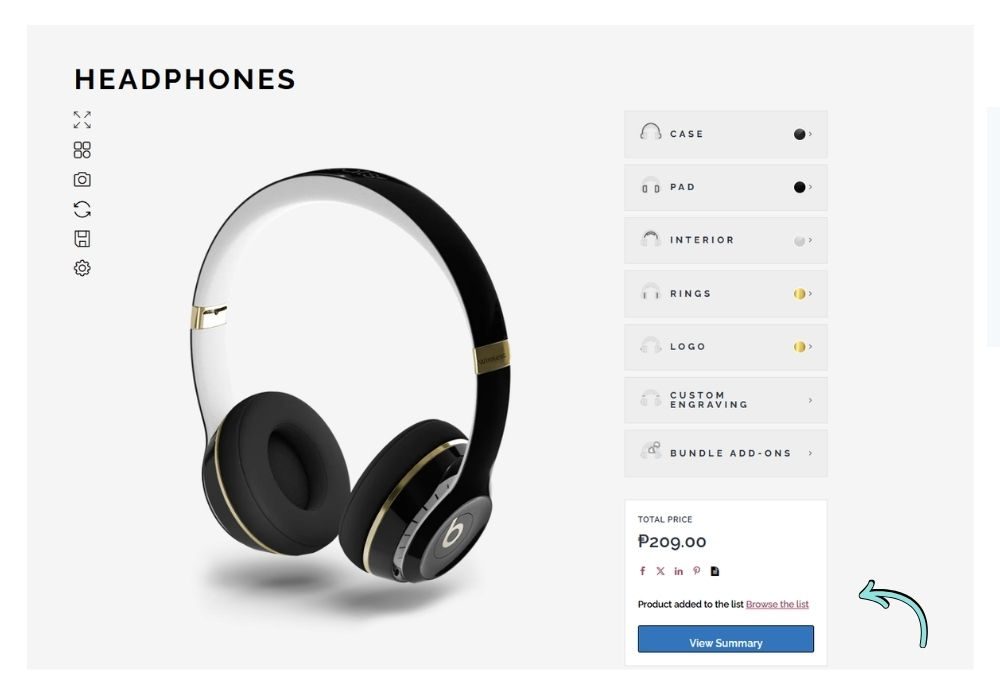
Limitation: one configuration per product.
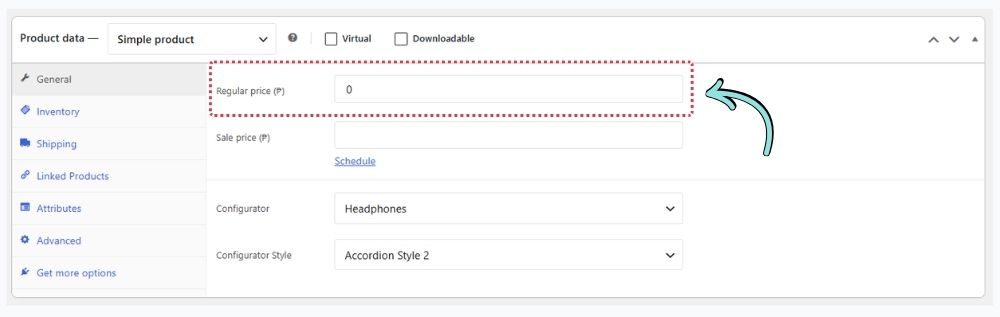
6. Set a Regular Product Price
Make sure each configurable WooCommerce product has a regular price set. A price of 0 is acceptable if you don’t want to charge customers directly for the product.
The quote list shows the WooCommerce product price, not the configurator total.
If the regular price is missing, WP Configurator may hide the entire configurator form area, including the button customers need to interact with it.
7. Set Component Quantities and SKUs
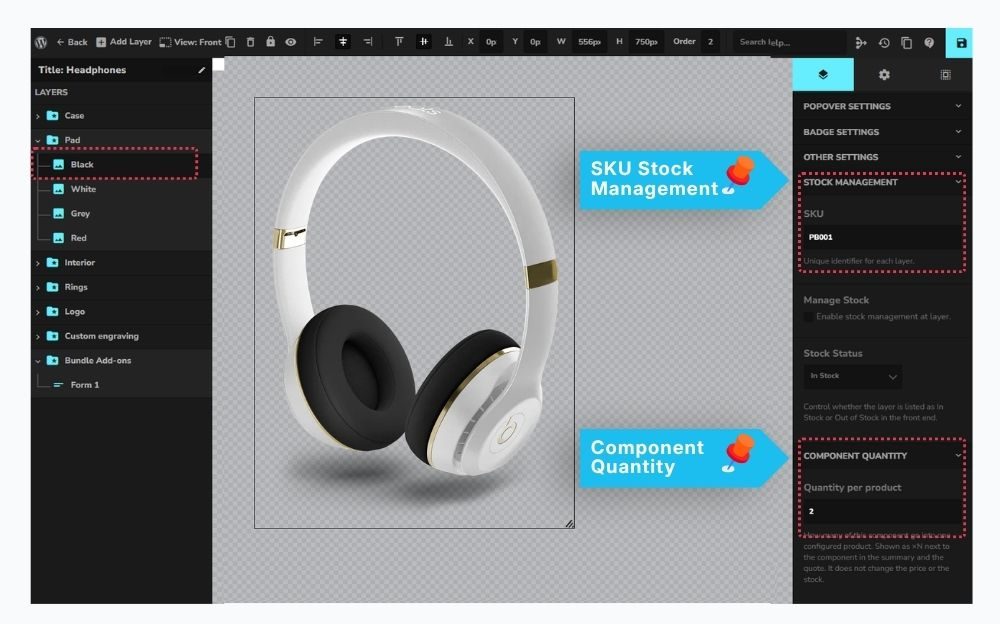
Go to Configurator → Settings → General and set Component SKU & Quantity to Show.
If your quote workflow requires component quantities and SKUs, configure these settings for each relevant layer in the WP Configurator editor.
- Component Quantity: Open the layer’s Component Quantity → Quantity per product panel and enter the required quantity. Quantity per product is informational. It does not change the price or stock.
- SKU: Open the layer’s Stock Management panel and enter the SKU. Make sure the Inventory Management add-on is active. It adds the Stock Management panel.
Repeat these steps for each layer that requires quantity or SKU information, then test the configurator to confirm the settings work as expected.
Once everything is configured, test the full quote workflow to ensure customers can customize products, add them to the quote basket, and submit their quote requests successfully.