
This guide explains how to safely transfer updates from a WordPress staging environment to the live production site.
Step 1: Download Updated Packages from Staging
- Log in to your staging site WordPress dashboard.
- Ensure the plugin Download Plugins and Themes from Dashboard is installed and active. This plugin allows you to download installed plugins and themes in .zip format directly from the WordPress dashboard (no FTP needed).
- Go to the plugin’s page and download the
.zipfiles of any updated and custom plugins and themes made by our teamExamples:
-
WP Configurator Pro
-
Any custom add-ons or related plugins
-
- Go to Appearance → Themes and download the Child Theme zip file (if applicable).
Step 2: Backup the Live Site
- Log in to your live site WordPress dashboard.
- Use your backup plugin (e.g., UpdraftPlus, All-in-One WP Migration, etc.) or your hosting backup tool.
- Make sure both the files and the database are backed up.
Step 3: Upload and Install on Live Site
- In the live site WordPress dashboard:
- Go to Plugins → Add New → Upload Plugin to upload the updated plugin
.zipfiles. - Go to Appearance → Themes → Add New → Upload Theme to upload the updated child theme
.zipfile.
- Go to Plugins → Add New → Upload Plugin to upload the updated plugin
- Select the .zip file(s) downloaded from the staging site
- Click Install Now, then Activate.
Step 4: Testing & Reminders
After activating updates:
-
Clear your website and server cache (including CDN if used).
-
Verify that the configurator and any custom features are working as expected.
✅ You have now successfully moved updates from staging to live.
Next, make sure your license is deactivated on the staging site and activated on the live site.
Manually Deactivating the License from Your Account
If you encounter an “Invalid License” message when trying to activate WP Configurator Pro on your live site, it’s likely because your license is still active on your staging or previous site.
You can manually deactivate it from your WP Configurator account by following these steps:
Step 1 – Log in to Your Account
Go to https://my.wpconfigurator.com/account/ and log in with your registered email address.
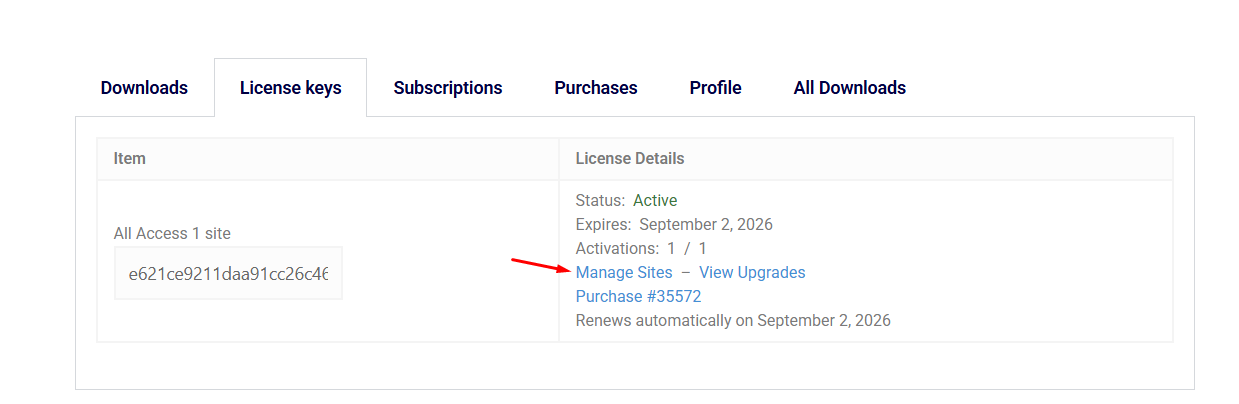
Step 2 – Go to the “License Keys” Tab
Once logged in, click on the “License keys” tab from the account menu.

Step 3 – Manage Sites
Under your active license, click “Manage Sites.”
Step 4 – Deactivate the Site
You’ll see a list of activated sites.
Find your staging or old site (for example, cayennex live site) and click “Deactivate.”

Step 5 – Reactivate on Your Live Site
After deactivation:
-
Go to your live site’s WordPress dashboard.
-
Navigate to Configurator → License.
-
Enter your license key again.
-
Click Activate License.
Your license should now activate successfully on the new site.