Creating Your First Configurator
- Go to Configurator → Add New Configurator
- Name it: Chesterfield Chair
- Choose skin: Accordion Style 2
- Click Create Configurator
Build Your Product Structure
Front Seat (Group – Required)
├── Red (Layer)
├── Blue (Layer)
└── Cyan (Layer)
└── Purple (Layer)
└── Green (Layer)
Back Seat (Group – Required)
├── White (Layer)
└── Black (Layer)
Plate (Group – Required)
├── White (Layer)
└── Black (Layer)
Chair Base (Group – Required)
├── Maple (Layer)
├── Ebony (Layer)
└── Beech (Layer)
└── Purpleheart (Layer)
└── Greenheart (Layer)

Other Settings – There are lots of options that belong to the other settings that can be modified.
- Description – you can add any description for your group layer.
- Required Option – This option must be enabled for the group layer category because these parts like base color, sole, strap are needed to create sunglasses.
- Multiple – You can allow this to have multiple selections.
- Hide Control – You can hide this and child layers in controls.
- Switch View – Switch to the selected view when the user clicks this control.
- Deselect Child – Remove all sibling’s active layers in this group. If you have a variant of colors like for example (DARK(red, military green, gray, black) LIGHT(white, yellow, blue) TEXTURE(Snake, Camouflage)) and you want that your customer/client will only choose one color among all of the colors. This feature will work only if you have enabled the deselect child on the parent layer.
- Control Title from addon – This is a new feature added where you can enter a short title
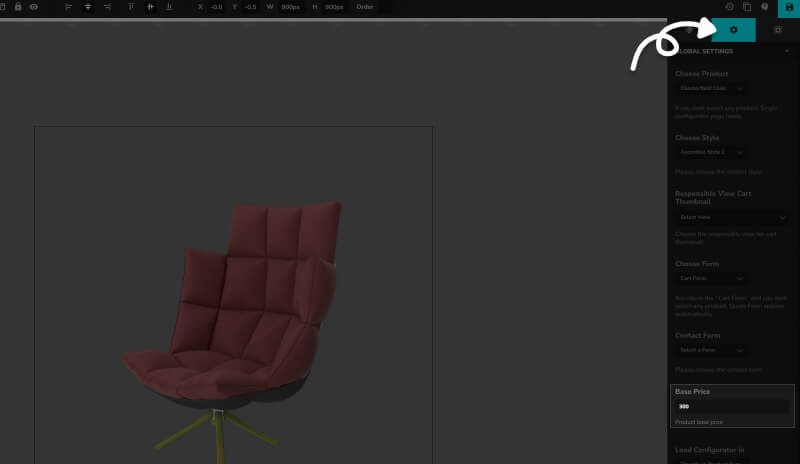
Set Base Price in Global Settings
The base price must be set in the configurator, not in WooCommerce.
- In the configurator editor, click the cog icon → Global Settings
- Enter starting price (e.g., $25)
- Click Save