
Now that you know how you can assign the Configuration to your product, let’s learn how to create a Configurator so that you can use it for your product.
Image Preparation – The Make-or-Break Factor (45 Minutes)
Image quality is crucial: 80% of configurator projects succeed or fail based on professional, consistent images.
Watch this detailed tutorial on creating layered images in Photoshop – it explains the complete process step-by-step.
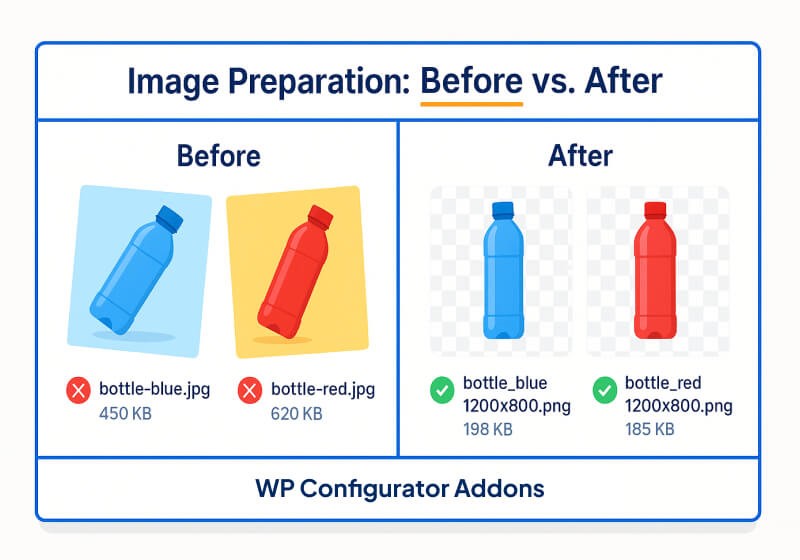
Image Requirements:
- Format: PNG with transparent background (not JPG)
- Dimensions: Consistent across all images (max 1200×800px)
- File Size: Under 200KB each (compress with TinyPNG)
Alignment: Each variation must be positioned identically

File Naming Tip:
Use a consistent pattern to save hours:
productname-part-variation.png
Example: waterbottle-body-red.png, waterbottle-cap-white.png
💡 Pro Tip: If image editing is challenging, we offer Custom Layered Image Services for Configurable Products. Provide one reference photo and a list of variations. Typical cost: $5 per variation.
If you want to learn the basic tutorial of photoshop here are some links: https://helpx.adobe.com/sea/photoshop/tutorials.html
Image Optimization (Critical for Speed)
Oversized images are the most common cause of slow performance. Follow this workflow:
- Resize: Set a maximum width of 1200px, maintaining aspect ratio
- Compress: Use tools like TinyPNG or ImageOptim to reduce file size by 70%+
- Format: Use PNG for transparency and WebP for modern browsers
- Lazy Load: Configure your caching plugin to lazy load configurator images