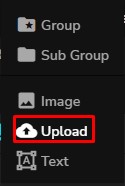
Inside your Configurator Editing Panel, you will initially notice the option when you hover on “Add Layer” then just choose “Upload” layer
Before adding the upload image layer, you must add the product image/image layer of your choice then you can proceed to customize it with the add-on.
Clicking the uploaded layer you added recently, will display more options on the right side of your browser. Let’s check the new features:
- Layer Type – Determines what type of layer in the configurator is added. You can simply switch layers by choosing according to what layer you want.
- Control Settings – These displays all the options needed to create an uploaded layer. The settings contain the following:
-
- Control Icon – You can choose your desired icon for the uploaded layer. This will appear on the front end.
- Placeholder – This is simply a guide in the editor to specify the image size displayed on the front end.
-
- Transform Type – You can never go wrong with the transform type which gives the custom image a little bit more real where you can set your image into a 2D or 3D position. There are a lot of options for both types of positions.
- Allowed Views – You can set your image where you want it to be displayed if you have 2 or more views. Also, note that your added custom image will not display if the allowed view is not set.
-
- Linked Upload – This feature really helps a lot for your product, this is like duplicating your upload layer but way better since you can still customize your control icon, transform options, and allowed views. This is great for product branding.

